Our first Hackathon
One of the extra professional activities we started here at theTribe is the organisation of small internal events, scheduled on a week evening, that we called “Hackathon”. The principle is simple: we gather after work, begin a simple and short project, with some pizzas and beers (very important ;) ), and we share about our practices to produce something that works before going home. These sessions have multiple beneficial effects: the project aims to simplify our every day life, it is an occasion to test new technologies and frameworks, and the team spirit is boosted as everybody work on the same project with everyone creativity
Who the hell will unlock the door ?
As we moved into our new office, we realized we didn’t have enough keys for everyone in the team, for the entrance of the building. When you don’t have the key, you have to call on the intercom to get the door open. Furthermore, our landlord isn’t a big fan of having 25 keys for a single office, so we gave the keys to the guys who begin early, and the rest of us just had to ring the bell. Easy, simple, no problem. Until the two guys with the keys are late or sick or someone gets mad because of the continuous intercom ringing between 9am and 10am. So we decided to take care of this by linking the intercom to our Slack team in order to be able to open the door from outside the office (or when we are too lazy to move 10 meters to open the door). Here was the subject for our first Hackathon session.
Software
The easiest and more secure way to handle the intercom via Internet for us was to connect a bot on the local network to Slack, and control this bot via Slack. Thus, the bot is isolated from the global network and cannot be hacked directly. This solution demands of course to trust Slack, and we made this choice willingly.
The first step was therefore to create a Slack bot user and to connect it to our team. Slack offers a relatively simple service for that (see documentation here); once the bot user created, it can be accessed directly from our code via Slack’s Real Time Messaging API (RTM API). Once connected, the code can intercept every message posted on the channel to trigger a callback.
The code
We decided to use NodeJS to program the bot, because it is rather simple to set up and the RTM API can be used quite simply with a single package.
The base code for connecting the bot to slack and listening to the events is the following:
var RtmClient = require('@slack/client').RtmClient;
var RTM_EVENTS = require('@slack/client').RTM_EVENTS;

rtm.start();

rtm.on(RTM_EVENTS.MESSAGE, function(message) {
  // Callback triggered every time a message is sent to a channel where
  // the bot is present or directly to the bot via private message
});
The second problem was to connect the bot to the Raspberry Pi’s pins, in order to send electrical signals to the relay and then open the door (see Hardware).
Fortunately, a library has been developed just to control the pins! It also works with events, and it’s rather simple to use too:
var gpio = require('rpi-gpio');

// Set up a channel for read or write
gpio.setup(channel [, direction, edge], callback);

// Write the value of a channel
gpio.write(channel, value, callback);
With these elementary bricks, it was then easy to write the code to open the door, and with a bit of debug, to make it work.
require('dotenv').load();

var _ = require('lodash');
var gpio = require('rpi-gpio');
var RtmClient = require('@slack/client').RtmClient;
var RTM_EVENTS = require('@slack/client').RTM_EVENTS;

var rtm = new RtmClient(process.env.SLACK_API_TOKEN, { logLevel: 'warning' });

var PIN_BUTTON = 6; // Arbitrary pin connected to the opening button
var PUSH_BUTTON_DELAY = 3000; // Delay during which the opening signal is sent

rtm.start();

var lock = false;

function openTheDoor(cb) {
  if (lock) return;
  lock = true;
  gpio.setup(PIN_BUTTON, gpio.DIR_OUT, function() {
    gpio.write(PIN_BUTTON, false, function(err) {
      if (err) throw err;
      setTimeout(function() {
        gpio.write(PIN_BUTTON, true, function(error) {
          if (error) throw error;
          lock = false;
          if (cb) cb();
        });
      }, PUSH_BUTTON_DELAY);
    });
  });
}

// Chat bot
rtm.on(RTM_EVENTS.MESSAGE, function(message) {
  function contains(needles) {
    return message.text && _.every(needles, function(needle) {
      return message.text.toLowerCase().indexOf(needle.toLowerCase()) !== -1;
    });
  }

  if (contains(['<@' + rtm.activeUserId + '>', 'open'])) {
    rtm.sendMessage('I will now open the door!', message.channel);
    openTheDoor(function() {
      rtm.sendMessage('The door is opened', message.channel);
    });
  }
});
Service
The last step was to encapsulate the bot in a service to run as a background process and, ideally, boot on startup in case of power cut.
Since our Raspbian (a Debian-based OS optimized for Raspberry Pi) uses Systemd to manage the services, we configured a new service named thedoor as follows:
[Unit]
Description=theDoor
After=network.target

[Service]
Type=simple
ExecStart=/usr/bin/nodejs /home/pi/thedoor/index.js
Restart=always

[Install]
WantedBy=default.target
Finally, we configured it as a service, which needs to be activated with systemctl enable thedoor.
Hardware
First, we had to check how our intercom is working in order to know what we can do with it. We looked up for electrical plans on the Internet and found this wiring diagram:

Thanks to that, we know that when we are pressing the opening button, it creates a contact allowing the current to pass through the door-opening system. All we have to do is connect the two parts linked to the button to open the door whenever we want.
To do so, we need to isolate the control system (the Raspberry) from the active system (the intercom) because they do not work under the same voltage and amperage. We selected the following relay to do the job:

The commutation voltage is around 3V and can handle a lot more than the 15V we have in the door-opening circuit. This relay allows us to close the door-opening circuit when we have 5V on an out pin of the Raspberry. Moreover, having a spare relay on the component allows us to add other features to the system if need be.
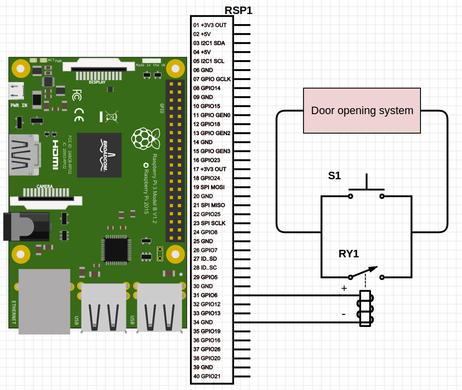
With everything in mind, we came up with this simple wiring diagram for our project:

The button and the relay are wired in parallel, allowing us to use both our Raspberry and the intercom button to close the circuit and open the door.
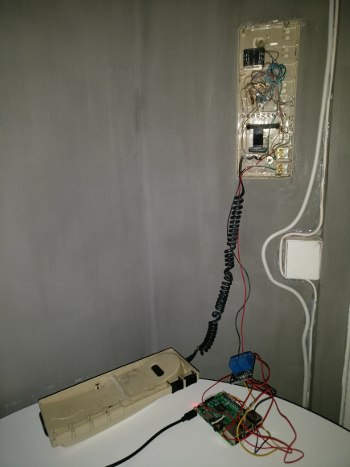
After some welding, we connected our system to the intercom:

The screws used to connect the button to the door-opening circuit make it easy for us to add our system without damaging the intercom (We don’t want to upset our landlord, do we?).
Conclusion
It took us 4 hours for an approximate cost of 60€, but the result is here, we can now open the door thanks to our smartphones with a simple message on Slack! No more ringing bell in the morning, welcome Slack notifications!


